One of the things I like about Visio are smart shapes. The trouble is that most of what is offered as Visio shapes is no more than clipart encapsulated in a Visio shape. For most purposes, that is fine, So time for some real Visio shapes.
A pool table is a good candidate for a smart Visio shape. There are several varieties o table, but they only differ by length and width. So how do create this shape?
Research
The place to start is to do a search on as much information as possible to work out all the dimensions, markings and colours. This will give you an idea of the type of variations that can be handled by a smart shape.
Design
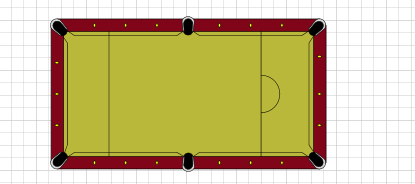
The basic shape may be intimidating with all the finicky details around the pockets, but it is basically two rectangles and size pocket shapes. Okay, two pocket shapes. One for the dise and one for the corners, You basically need to look at it through an artist’s eyes. Paint the background and then paint the pockets on top. The background is basically a brown rectangle to represent the rails and a smaller green rectangle to place on top. No need for trying to fit the cloth around the pockets. The pockets are just painted on top. Think overlays. Rather than try to trim the cloth around the pockets, treat it like a basic rectangle and cover it with the pockets.
Visio shapes are limited in colour and line weights so to get a more varied shape, it will be necessary to group several shapes. Of course, there is over head, so limit the number of shapes and the number of levels of groups to one. The top level (or group shape) should contain all the UI to the user and the sub shapes should use their User sections as an interface to the top level. You could wire the sub shapes directly to the top shape, but is a mess if the shape is ungrouped. By providing the user cells as an interface, it is easy to restitch if it is ungrouped. (Of course, I do not always follow my own advice. )
So what makes this shape smart? It has two custom properties, (for now). One controls the table length and the other the colour of the cloth. All tables have a length Width ratio of two to one, so only one dimension is needed. The sizes listed are the ones I was able to find. The lines on the table are based on tables I found and it turns out that there is no formula for the location of the baulk or the D line or the actual radius of the D. The fourty or so cloth colours are based on sales brochures I found, so some of the colours may be pushing the taste of some customers. Of special note, black lines on a black cloth has visibility issues, so the colour of the markings changes to white. A later version may have a custom property to control the line colour. The line colour, width of the bumpers, line position and D radius are all User data cells that can be changed. A User cell is the stay at home cousin of Shape Data, AKA Custom properties. Hidden from the public and less versatile.
Do not forget the accessories. Though the primary reason is to create a shape to represent a pool table in a floor plan, that does not mean you can not use it for other things. With the right accessories, you can use the shape as a training tool setting up possible scenarios and ho to play them. Fodder for the next blog…
)for now)
A copy of the Visio drawing is in the Technet Gallery Pool Table
Enjoy…
John Marshall… Visio MVP Visio.MVPs.org
John Marshall… Visio MVP Visio.MVPs.org

John,
Are you able to insert an image or two in your post to make it more visually appealing?
David
That was an issue with how Visio was handling the RGB values with some languages. The latest version should have that fixed.