
Visio has had reporting capabilities for several versions, but it has not been well documented. There are blogs and videos on how to create a report, so I decided to create a document to provide more details about the file that reporting feature creates *.VRD files. To do that I had to create two Word macros to help explore the topic. Luckily the original Visio team that created the Reporting feature left some bread crumbs for me to follow.
When you create a Visio report, you can choose to use an existing report or create one from scratch. In their wisdom, the original Visio team used XML to create/document the reports and gave the users the ability to create their own reports and save the report definition in an XML file with the extension of VRD. Being XML, these reports are readable, not pretty, but readable. I only came across one badly written blog on VRD files (that apply to Visio) and that was by me. So, I definitely need to create a document on the VRD file format and bring the blog up to date with correct information and David’s standards for a Visio blog. (If you are going to write about Visio, we want pictures.)
So, the first thing I needed to do to understand these files was to search existing VRD files and properly identify the tags and parameters. So, I did a DOS copy (copy *.VRD >tmp.txt) and concatenated the VRF files into a single file. I had to do that for a number of directories because they contained similarly named files for different Visio versions, some with the same sizes.
Were they the same or were there subtle differences?
Then I needed to “Format” the file so it was easier to understand. XML is just a very long string so I needed to add <CR>s between the tags. At this point I was only interested in the tags and parameters. So I then sorted the file and started to remove duplicates. Since the End tags </xxx> were not important and the sort had grouped them together, I deleted them. At this point I was only interested in what was in the tags, not how they related to other tags in the file.
The next thing to do was to isolate the tags and parameters. The parameters were delimited by spaces. Since Excel was better at handling cells and the parameters were optional, I moved the table to Excel and inserted cells to account for missing parameters and make the parameters line up. Actually, before I did that, I replaced the spaces with tabs so that Excel would split the parameters across columns. I moved between Excel and Word a few times because Excel was good at adding cells to make things align while Word was better at removing tabs to concatenate cells. The VRD file did contain Description and Title parameters that had text that included blanks, so I had to replace those tabs with spaces which was easier to remove in Word with Find/Replace. With each transfer, I was able to remove duplicate rows because they did not contain anything that could be considered unique. I did not need to know what was in the title or description, just that that parameter existed.
So now that I had a file that contained the unique tags and parameters. I needed a new Word document that contained all the VDF files (formatted for readability) with a header that contained the path and name of the VRD file. A Copy to concatenate the files would work, but it would not add the file names, I needed a macro. With this file I can use it to explore the information from the first file and see how those parameters worked with other tags and parameters and see the variety of values. Since I needed to do this in several directories, and I was not sure I had found all the VRDs on my system I needed a recursive Word macro. It was also possible to create new VDFs as more features needed exploring, so an auto-creation of the file was worth the time creating the macro.
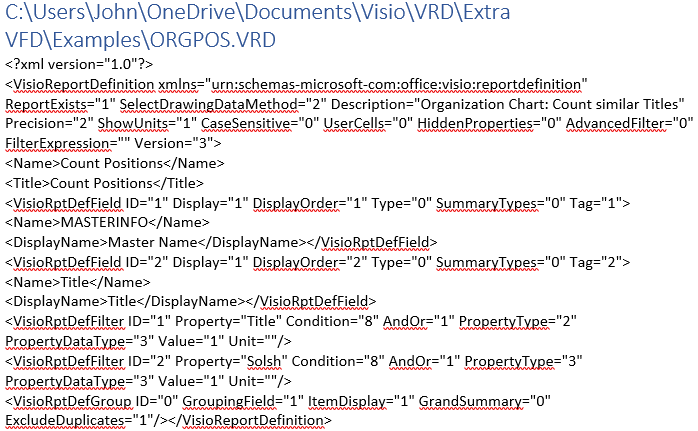
VRD List
Most of the stuff in the first macro was standard Word VBA, the only catch was that Word wanted to interpret the Visio XML, so the standard routines of adding text to Word did not work. I had to use some Jedi mind tricks – “These are not the XML tags you are looking for.”
Selection.InsertFile fileName:=fileName, ConfirmConversions:=FalseDid not work because Word wanted to interpret the XML. Treating the XML file as a text file worked.
Set FileToRead = FSO.OpenTextFile(File, ForReading)
Selection.TypeText Text:=FileToRead.ReadAll
Since I am not sure what folder to look in, the code is recursive. For now, I will use the root folder that contains sub folders of VRD files. Eventually, I will try it in C: to see whether there are other files hidden on the drive.
Sub VRDList()
Dim FSO As Object, fldr As String, fldrPath As String, intResult As Integer
fldr = "C:\Users\" & Environ$("Username") & "\OneDrive\Documents\Visio\vrd"
Set FSO = CreateObject("Scripting.FileSystemObject")
Documents.Add Template:="Normal", NewTemplate:=False, DocumentType:=0
With Selection.PageSetup
    .Orientation = wdOrientPortrait
    .TopMargin = .BottomMargin = .LeftMargin = .RightMargin = .HeaderDistance = .FooterDistance = InchesToPoints(0.5)
End With
intResult = Application.FileDialog(msoFileDialogFolderPicker).Show
If intResult <> 0 Then  'checks if user has cancled the dialog
    fldrPath = Application.FileDialog(msoFileDialogFolderPicker).SelectedItems(1)
    VRDListSub FSO.GetFolder(fldrPath)
End If
End Sub

Sub VRDListSub(Folder)
Dim File As Object
Dim FileExt As String
Dim FileToRead As Object
Dim fldrPath As String
Dim FSO As Object
Dim strPath As String
Dim SubFolder As Object

Set FSO = CreateObject("Scripting.FileSystemObject")
For Each SubFolder In Folder.SubFolders
    VRDListSub SubFolder
Next
For Each File In Folder.Files
strPath = File.ParentFolder.path & "\" & File.Name
FileExt = FSO.GetExtensionName(strPath)
If FileExt = "VRD" Then
    Selection.Style = ActiveDocument.Styles("Heading 1")
    Selection.TypeText Text:=File
    Selection.TypeParagraph
    Set FileToRead = FSO.OpenTextFile(File, ForReading)
    Selection.TypeText Text:=FileToRead.ReadAll
    FileToRead.Close
    End If
Next
End Sub
Collect Consolidate & Clean
When I first started looking at VRDs, I created a VRD folder in my Documents/Visio folder to hold what I found. I created a sample folder under that for any VRD files I found. Early on I did a Dir C:*.VRD /S to create a directory list of the VRDs. I made copies of some of those VRDs in my sample folder. So, when I started to look at the VRDs I created a new directory list and noticed that there were directories of VRDs with the same names and sizes, so I knew I had potential duplicates. Once I had the code to create a Word document of the Formatted VRDs I modified a copy and simplified the Word document to just contain two fields, the path/file name and the XML content of the VRDs, separated by a tab. On the first run I found that the VRD files contain two lines, an XML header tag and a tag for the XML, separated by a <CR>. Luckily the header tag ended with “?>”, so, in Word, I just needed to replace the <CR> with a <Tab> . Now I had a tab delimited Word document. I copied the content to Excel and let it convert the tabs into a three column table. In cell D2 I entered the formula IF(C1=C2,1,0) and replicated it down the column. I then had a way of identifying the duplicate XML files. Then it was just a matter of deleting the duplicates from my samples folder.
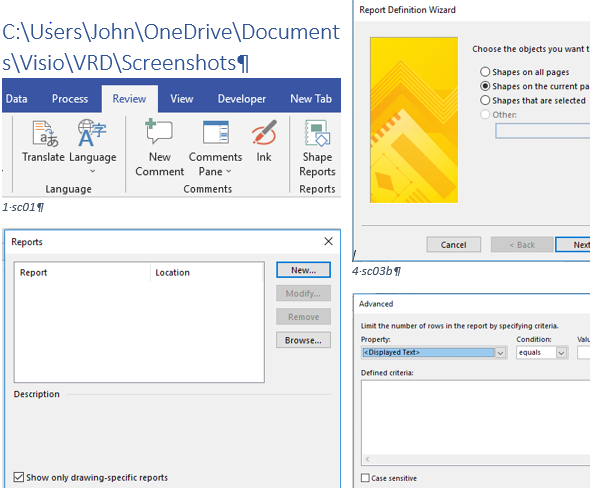
Screenshot Gallery
This macro is dedicated to David Parker. He mentioned early on that my early blogs were mainly text and insisted that Visio is visual and that if you are going to write about Visio, you needed pictures.
To keep things organized, I save the screenshots for a project in a subdirectory called screenshots with each new file given a sequential name. As I review the images, I gave them more appropriate names. It is a one level folder, no subfolders, so recursion is not required.
The second Word macro was to create a Word document of the screenshots I needed for the documentation and the blog. With the file explorer set to large icon, A lot of screen shots looked alike there was not enough detail. I needed something between a full image and the large icon file folder. This was to be an onscreen document with no plans on printing, so margins were minimized.
Sub ScreenShotGallery()
Dim intResult As Integer, fldrPath As String
Dim FSO As Object, FSOFile As Object, FSOfldr As Object, strPath As String

Documents.Add Template:="Normal", NewTemplate:=False, DocumentType:=0
With Selection.PageSetup
    .Orientation = wdOrientPortrait
    .TopMargin = .BottomMargin = .LeftMargin = .RightMargin = .HeaderDistance = .FooterDistance = InchesToPoints(0.5)
    .Gutter = InchesToPoints(0)
End With
Selection.WholeStory
With ActiveDocument.PageSetup.TextColumns
    .SetCount NumColumns:=2
    .EvenlySpaced = True
    .LineBetween = False
    .Width = InchesToPoints(3.2)
    .Spacing = InchesToPoints(0.1)
End With
intResult = Application.FileDialog(msoFileDialogFolderPicker).Show
If intResult <> 0 Then  'checks if user has cancled the dialog
    fldrPath = Application.FileDialog(msoFileDialogFolderPicker).SelectedItems(1)
    Selection.TypeText Text:=fldrPath
    Selection.Style = ActiveDocument.Styles("Heading 1")
    Selection.TypeParagraph
    Set FSO = CreateObject("Scripting.FileSystemObject")
    Set FSOfldr = FSO.GetFolder(fldrPath)
    For Each FSOFile In FSOfldr.Files
        strPath = FSOFile.path
        If FSO.GetExtensionName(strPath) = "PNG" Then
            Selection.InlineShapes.AddPicture fileName:=strPath, LinktoFile:=False, savewithdocument:=True
            Selection.InsertCaption Label:=wdCaptionFigure, Title:=" " & FSO.GetBaseName(strPath), Position:=wdCaptionPositionBelow, ExcludeLabel:=True
            Selection.TypeParagraph
        End If
    Next FSOFile
End If
End Sub
The first thing the macro does is create a fresh new Word document with narrow margins and a two column format.
It then calls Application.FileDialog(msoFileDialogFolderPicker) to select the folder that contains the screen shots.
It then writes the folder-path and gives it a Header1 style to make it stand out.
Then for each file in that folder, I check if it is a PNG and if it is I do an Add Picture and use the file name as a Caption. Word is smart enough to shrink the image to fit in the available space, so scaling the picture is not required.
I did use a separate macro to do some formatting afterwards to replace
the “><” with “><CR><” and replace the “”><CR></” with “></”.
After Thoughts
I should have used a command line Zip to create a copy of all the VRD files on the drive using *.VRD as the file name. Then I could easily unload the files into my sample folder with an unzip.
The Word team should look at how the Caption function works. I had to add a space to the start of the Title to separate it from the Figure number. Does the space affect how the Title looks in the list of figure or other references? What happens when you look up Title with code?
I created these routines to be used with Visio VFD files, but there is no reason they can not be used with other XML files and the screenshot list can be used by anyone who blogs who want better control of their images.
Now back to exploring the mysteries of the VDR files. (and jumps in Custom line patterns and…)
John… Visio MVP in x-aisle
JohnVisioMVP.ca
